Introduction
Specialty retailers running a POS system alongside QuickBooks often face a frustrating reality: double-entering sales data, reconciling mismatched records, and losing 10 to 20+ hours every week to manual bookkeeping. Research from integration vendors like Webgility shows that manual order posting alone can consume over 20 hours per week before automation. The right integration between your POS and QuickBooks eliminates that bottleneck — and keeps your books accurate without the manual work.
This guide covers what you need to prepare, how to execute the connection step by step, which factors control whether the sync works reliably, and the most common points of failure to watch for.
Key Takeaways
- Connecting your POS to QuickBooks eliminates manual data entry and keeps sales, inventory, and accounting records in sync automatically
- The method you use depends on your POS system and QuickBooks version (Online vs. Desktop)
- Before starting, verify compatibility, set up your chart of accounts, and match payment categories in both systems
- Skipped data mapping and mismatched account names cause the majority of setup failures — check these first
- For specialty retailers managing complex inventory, real-time sync prevents the data gaps that batch imports miss
What You Need Before Connecting Your POS to QuickBooks
Getting your accounts and settings aligned before you connect is what separates a clean first sync from weeks of reconciliation headaches. These three areas need to be in order before you touch any integration settings.
QuickBooks Version and Admin Access
The critical distinction between QuickBooks Online and QuickBooks Desktop determines everything about your integration. Many POS integrations only support one version, and using the wrong one will prevent connection entirely.
QuickBooks Online uses cloud-based, real-time API connections that most modern POS systems support. QuickBooks Desktop requires local software connectors and periodic manual sync triggers, which means more manual steps and ongoing maintenance.
Before proceeding, confirm:
- Which QuickBooks version you're running (log in and check your account dashboard)
- That you have admin-level login credentials (Primary Admin or Company Admin rights are required to authorize third-party applications)
Chart of Accounts and Category Alignment
Your POS sales categories, tax codes, and payment methods (cash, credit, gift card, etc.) must be mapped to matching accounts in your QuickBooks chart of accounts before the first sync runs. Mismatches here cause transactions to post to the wrong accounts or fail silently.
Create or verify these accounts in QuickBooks:
- Sales revenue streams (by department or product category)
- Payment processing fees
- Sales taxes collected
- Tips and gratuities
- Discounts and promotions
- Cost of Goods Sold (COGS) and inventory assets
Incomplete mapping leads to reconciliation errors at month-end and can cause your profit & loss statements to reflect inaccurate revenue by category.
POS System Compatibility Check
Verify whether your POS has a native QuickBooks integration built in, requires a third-party connector app, or only supports manual data export.
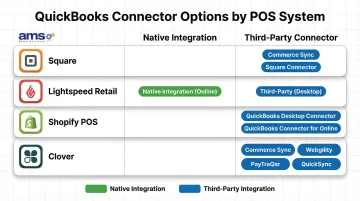
Most modern POS systems require third-party connectors:
- Square: Square Connector (from Intuit) or Commerce Sync
- Lightspeed Retail: Native for QuickBooks Online (with limitations), third-party for Desktop
- Shopify POS: QuickBooks Desktop Connector or QuickBooks Connector for Online
- Clover: Commerce Sync, Webgility, PayTraQer, or QuickSync
Specialty retail POS platforms like NCR Voyix Counterpoint (used by AMS Retail Solutions) are built with QuickBooks compatibility in mind. Pre-built account mapping templates mean retailers in categories like garden centers, farm markets, and pet supply stores spend less time configuring and more time selling.
How to Connect Your POS System to QuickBooks: Step-by-Step
The interface looks different depending on your POS platform, but the underlying workflow is the same whether you're using a native integration, a connector tool, or middleware.
Step 1: Confirm Your QuickBooks Version and Integration Method
Log into QuickBooks and confirm whether you're on QuickBooks Online or QuickBooks Desktop — this determines which connection path is available to you.
Then, in your POS system's settings or app marketplace, locate the QuickBooks integration module. Verify it supports your specific version before downloading or activating anything.
Step 2: Set Up Your Chart of Accounts and Data Mapping
In QuickBooks, review your chart of accounts and create or confirm the accounts where POS sales revenue, sales tax, payment types, and refunds should post.
Inside the POS integration settings, map each sales category and payment method from your POS to its corresponding QuickBooks account. Most users skip this step — and it's the most common reason revenue posts to the wrong account or books don't balance at month-end.
Mapping checklist:
- Sales categories → Revenue accounts
- Payment methods → Asset or liability accounts
- Tax rates → Sales tax payable accounts
- Discounts → Contra-revenue (discount) accounts
- Refunds → Sales returns accounts
If your POS supports it, create a default customer record — such as "Daily Sales" — in QuickBooks to receive end-of-day summary transactions and keep your customer list clean.
Step 3: Authenticate and Activate the Connection
Follow your POS system's prompts to authorize the connection. This typically means clicking "Connect to QuickBooks," signing into your Intuit account, and granting the integration permission to read and write data.
For third-party connector tools, the process adds one extra layer: create your account on that platform, then link both your POS and QuickBooks credentials. From there, select your sync preference — real-time, daily, or on-demand.
Step 4: Run a Test Sync and Verify Accuracy
Process a small test transaction in your POS system, then trigger a manual sync or wait for the scheduled sync window to pass.
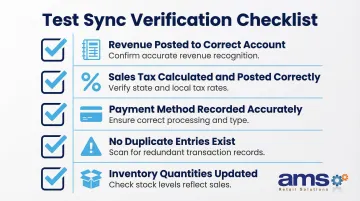
Log into QuickBooks and verify the transaction posted to the correct accounts, with the right amounts, tax values, and payment method. Check that no duplicate entries were created.
What to verify:
- Revenue posted to correct account
- Sales tax calculated and posted correctly
- Payment method recorded accurately
- No duplicate entries exist
- Inventory quantities updated (if applicable)
Once everything checks out, enable automatic syncing and document your mapping settings — you'll thank yourself during onboarding or the next staff training session.
Key Factors That Affect Your POS-QuickBooks Integration
A correctly configured integration can still produce reconciliation errors and failed syncs if these four variables aren't actively managed from the start.
QuickBooks Version (Online vs. Desktop)
QuickBooks Online uses cloud-based API connections that most modern POS systems support natively. QuickBooks Desktop requires local software connectors and periodic manual sync triggers, which means more manual steps and ongoing maintenance.
Retailers still running Desktop may face sync delays, need additional connector software, and spend more time troubleshooting when updates break the connection. Worth noting: Intuit stopped selling certain Desktop versions to new US customers after September 30, 2024, and support for the 2023 version ends May 31, 2026.
Data Mapping Completeness
Every sales category, discount type, tax rate, and payment method in your POS needs a corresponding account in QuickBooks. Gaps cause transactions to fail or land in a catch-all account — both distort your financial reports.
According to vendor documentation, incomplete mapping is the primary cause of integration failures. Common gaps to check before going live:
- Sales categories not matched to QuickBooks income accounts
- Discount types mapped to the wrong expense account
- Tax rates missing or duplicated in QuickBooks
- Payment methods (cash, card, gift card) assigned to separate clearing accounts
Sync Frequency
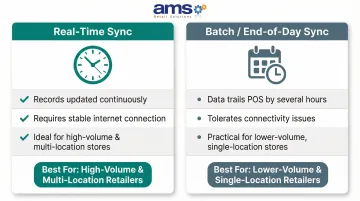
Real-time sync keeps records current throughout the day but requires a stable internet connection. End-of-day batch sync tolerates connectivity issues better, though your QuickBooks data will always trail your POS by several hours.
For high-volume stores or multi-location operations, real-time sync reduces reconciliation work significantly. Batch sync is a practical choice for lower-volume stores that close out daily and don't need intraday visibility into QuickBooks.
Integration Method Stability
Native integrations built directly into your POS platform are maintained by the software vendor and tend to stay current with QuickBooks updates. Third-party middleware tools introduce a dependency on an outside vendor's uptime and release schedule.
Before committing to an integration method, check for a documented uptime record and any known compatibility issues with recent QuickBooks or POS updates. That history is a reliable indicator of how often you'll need to intervene manually.
Common Mistakes When Connecting POS to QuickBooks
Most POS-to-QuickBooks integration failures trace back to a handful of preventable setup errors. Watch out for these four:
- Skip the chart of accounts mapping and transactions will post to incorrect or default accounts. Complete the mapping step before syncing any live sales data.
- Connect to the wrong QuickBooks version (for example, using a Desktop-only connector with QuickBooks Online) and the integration will fail entirely. Verify compatibility before installing any connector app.
- Run both a manual CSV import and an automatic sync simultaneously, and the same sales data posts twice. Disable manual imports as soon as automatic sync is active.
- Dismiss sync error notifications and QuickBooks data can go days without updating. Most integration tools send email alerts or dashboard warnings when a sync fails — treat them as urgent.
Troubleshooting POS-QuickBooks Integration Issues
Even well-configured integrations encounter problems. The four issues below cover the most common failure points — authentication, mapping, duplicates, and update breaks — along with what to check first.
Problem: Sync Fails Immediately After Setup
This almost always points to an expired authentication token or the wrong QuickBooks account used during setup. Re-authorize the QuickBooks connection from within your POS integration settings and confirm you're logged into the correct account — not a secondary or test account.
Keep in mind: QuickBooks API access tokens expire after 100 days and require refresh token rotation every 24 hours. If your sync worked initially and then stopped, a token refresh is the first thing to check.
Problem: Transactions Posting to Wrong Accounts
Incomplete data mapping is the usual culprit — especially when a new sales category was added to the POS after the initial setup. Open your integration's mapping settings and verify:
- Every active POS category has a corresponding QuickBooks account assigned
- Every payment type (cash, card, gift card) is mapped
- Any newly created categories have been added to the mapping
Problem: Duplicate Entries Appearing in QuickBooks
Duplicates typically mean two import processes are running at the same time — a manual import and an automatic sync — or the sync is configured to re-import historical data on every run. Review your sync settings to confirm the import date range, then disable any overlapping manual workflows. For entries already duplicated, locate them in your QuickBooks register and void or delete the extras.
Problem: Integration Stops Working After a Software Update
Software updates on either side — QuickBooks or your POS — can change API permissions or retire an older connection method without warning. When this happens:
- Review the release notes from your POS vendor and QuickBooks for any integration-related changes
- Re-authenticate the connection in your integration settings
- Update your connector app if a newer version is available
Choosing the Right Integration Method for Your Retail Business
Not all connection methods deliver the same reliability or level of detail. The right choice depends on your POS platform, QuickBooks version, and how much transaction volume you're managing. The three main options — native integration, third-party connectors, and manual export — each suit different situations.
Native/Built-In Integration
Best for retailers whose POS platform has a QuickBooks integration built directly into the software. Setup is faster, fewer third-party dependencies exist, and vendor support covers the full stack.
Specialty retail POS platforms designed for businesses like garden centers, farm markets, or pet stores often include this as part of their service model. Integration support becomes part of an ongoing relationship rather than a one-time setup task — meaning one team is accountable if something breaks.
The trade-off: you're limited to the QuickBooks versions and feature set the vendor has built support for, with less flexibility to customize how data flows.
Third-Party Middleware Connector
Useful when your POS doesn't have a native QuickBooks integration, or when you need more granular control over how transaction data is categorized and synced across multiple sales channels.
Popular connectors include:
- Commerce Sync ($17.95–$59.95/month)
- Webgility ($24–$149/month)
- Connex (quote-based pricing)
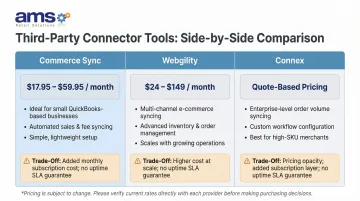
The trade-off is real: you're adding a third subscription cost and a third point of failure. If the connector misses a software update, your sync breaks until that vendor resolves it — and none of these tools offer formal uptime guarantees or SLAs.
Manual CSV Export
Only viable as a temporary workaround for very low transaction volumes, or when testing a new POS before committing to a full integration.
It's time-intensive, error-prone, and doesn't scale. Even moderate transaction volumes make manual exports unsustainable within weeks.
Frequently Asked Questions
What POS systems integrate with QuickBooks Online?
Most major modern POS platforms—including Square, Clover, Lightspeed, Shopify POS, and specialty retail systems like NCR Voyix Counterpoint—offer QuickBooks Online integration either natively or via a connector app. Check with your POS vendor before committing, as some integrations carry limitations—Lightspeed, for example, restricts US users to a single tax rate.
Is QuickBooks POS being discontinued?
Yes. Intuit discontinued QuickBooks Point of Sale software on October 3, 2023, meaning it no longer receives updates or support. Businesses previously using QuickBooks POS need to migrate to a compatible third-party POS system that integrates with QuickBooks Online or Desktop.
Is QuickBooks Desktop going away in 2026?
Intuit stopped selling several Desktop versions (Pro Plus, Premier Plus, Mac Plus) to new US customers after September 30, 2024, and support for QuickBooks Desktop 2023 ends May 31, 2026. Retailers relying on Desktop integrations should monitor Intuit's announcements and consider moving to QuickBooks Online.
Can QuickBooks POS integrate with QuickBooks Online?
Since QuickBooks POS (Intuit's native hardware/software bundle) has been discontinued, current users cannot create new integrations between it and QuickBooks Online. Migrating to a supported third-party POS with a QuickBooks Online connector is your best option.
What is the POS fee for QuickBooks?
Intuit no longer sells its own POS product, so there is no single "QuickBooks POS fee." Your costs depend on whichever third-party POS you choose, plus any connector subscription—QuickBooks Online runs $38–$275/month, and connector services typically add $20–$150+ per month.